Grow through dormancy..

IMG_4359.jpg

Winter is almost here, that means that most of life is either about to enter, or is already in a state of dormancy. I like to think of this time as the beginning of life, rather than the end. After all, with Winter Solstice comes an extras second or two of daylight that will eventually build into Spring. And I’m cool with that ๐Ÿ™‚

Even though I try to think positively about the coming-back of the sunshine, Winter still kicks my butt and makes me feel just as dark as the sky. The other day was one of those days. Fortunately for me, a really good friend of mine answered my call for help..and literally pulled me out of my shallow puddle. He was able to help me see things from a different “frame”. I was looking at life through a broken, old frame, and it just wasn’t working anymore. Feelings of failure and rejection had led me to believe I had nothing left. I was falling apart, leaf by leaf, until finally that last leaf fell and I felt like I was bare with nothing to hide me from myself. Instead of feeling sorry for me, he made me see that all of these were actually “blessings, and opportunities” for me to finally be able to answer the questions ofย  Who I Was and What Am I Passionate About.

These questions are what Dormancy is all about. A time to go within, into that dark place so that you can find your vision and truth again..so that when Spring finally comes, you are whole again because you’ve put all that energy into growing,ย  and you can again blossom and bloom into the best you.

I am very thankful for my friends that have been with me through all of my life changes, but even more thankful for ones who help me help myself. And that’s exactly what happened. I no longer feel lile I am laying face down in a puddle, sucking mud.

I hope this Winter, that everyone takes the time to let their leaves fall so that they can find out the answer to those same questions. If we all just keep going, and never stop to feel or bee, what use are we to the world? How can we ever really give our authentic gifts to the world if we can’t even take the time to see what they are. With that, I say celebrate the upcoming Winter Solstice with vigor and love, for yourself. XoXo Crystal


Strawberry Fields Forever

. 11348377_461074630728162_807940839_n

Strawberries, strawberries, strawberries…I wish they could last forever! Recently, I ate strawberry-something everyday for a week, and it was awesome. When lil’ bee and I picked a few pounds of these yummy berries, we had Strawberry Crepes with freshly whipped cream and a touch of cinnamon (for love), Strawberry Scones, and oatmeal or cold cereal with sliced berries each day for breakfast that week. Of course there were plenty of bowls of sweet berries with whip cream, honey and cinnamon for dessert too ๐Ÿ™‚

I hope that everyone of you are getting out there and enjoying these precious, yummy treats while they are fresh and ripe from the field…seriously you should be! Next is blueberries and cherries, and DANG, I can’t wait. The favorite thing I made with the strawberries were the Strawberry Scones. You could do it with the blueberries and cherries coming up next too. These are for real the BEST scones I have ever had….light, fluffy, sweet, and just right. So here ya go. Make it. Eat it.

Here is the link http://basictaste.blogspot.com/2010/04/blueberry-scones-from-americas-test.htmlย  to the original post, it is the recipe from Americas Test Kitchen, which basically means it is yumm!

*I changed it up a bit from the original recipe, and used only 1/4 cup of sugar since I was using honey yogurt.

Strawberry Scones

  • 8 TBS unsalted butter
  • 1 1/2 cups chopped, fresh strawberries
  • 1/3 cup milk
  • 2/3 cup Nancy’s Plain Greek Yogurt with Honey (just use plain if you want)
  • 2 cups all-purpose flour
  • 1/4 cup sugar
  • 2 tsp baking powder
  • 1 tsp fresh lemon zest
  • 1/4 tsp salt
  • 1/4 tsp baking soda

~Preheat oven to 425 F. Grease a baking sheet. Grate the butter and set aside in the freezer. Also, freeze your strawberries after you’ve chopped them (or use frozen berries). Whisk the yogurt and milk together, then refrigerate. *This is important, do this!

~In a large bowl, mix dry ingredients and zest.Next, add the frozen butter & berries. Mix until butter is covered with flour mixture. Fold in the yogurt/milk just until combined – DO NOT OVER MIX.

~Turn the dough out onto a floured area (I like a counter with plastic wrap over it for easy clean-up). Put some flour on your hands and knead for 6-8 times lightly. It should be a kinda sticky ball. Add a little bit of flour to keep it from sticking to your hands. Put more plastic wrap over it and then roll dough out in a 12″ square. Fold over in half to make a 6″ rectangle and chill in freezer for 5 minutes.

~Flour your area again. Cover your dough with plastic wrap then roll the dough back into a 12″ square. Spread the berries evenly over the dough. Fold all 4 sides towards the middle, making a 4″ square. Gently roll the dough into a log (I used my hands and kinda just wrangled it into a log) with the seam side down. Flatten the log out into a 12×4″ rectangle, about an inch thick. Use a floured knife to cut the dough in 4 small rectangles. Then cut each rectangle in 2 triangles. Place on the baking sheet.

~Bake for 18-25 minutes or until light goldeness happens. Let cool for a few minutes on the pan before eating.They are super good with honey drizzled over them too ๐Ÿ˜€

*They are best the day of baking. Put them in the oven to warm up if you don’t eat them all ๐Ÿ™‚

Hiking the PCT & Kayaking Frog Lake with the kiddos :)

August 2014 045

We did it, we hiked part of the Pacific Crest Trail!! It wasn’t far but it was awe inspiring ๐Ÿ™‚ I don’t know if the other moms knew how elated I was but, I was ๐Ÿ˜€

I’ll start from the beginning. Some of the moms, who I have become friends with through a local kids hiking group,had asked me to put together a kid friendly camp-out. I had remembered passing Frog Lake on the way back from Bend a few weeks ago and thinking “I have to go there, I just have to!”..not only because of the name (and reputation for the countless frogs croaking at night) but because it also had the words PCT Trail on the sign. I’ve been talking & talking about starting short PCT trips so I figures this was the best place to start. So we packed up our gear and headed out..swim suits check, kayaks check, hiking shoes check. ย  ย 

The campground at Frog lake was nice, and our sites were semi-private & large. If I was going solo I would choose #13 for its privacy, flat ground and proximity to the lake trail (we had #28 & #29, but I think 29 & 30 would be better for a kiddo group because 29 had lotsa cool logs to crawl through and climb in.. and 30 was large and flat, but cozy and private).ย  The lake is a quick walk down the path near site #12 (accessible to everyone), there are 3 bathrooms (so not to far for the lil’ ones..or the beer drinkers) that were well kept and not stanky at all, and no mosquitoes! As for swimming, I would recommend the day use side because the side near the campground is a little squishy, but the kids loved it and if you can get past that icky squishy feeling you can swim right out to the middle. From the campground side it stays fairly shallow for quite a ways, I don’t think the middle is any deeper than 10 feet or so, and the water was pretty pleasant. There were tiny frogs everywhere too! I heard a gaggle of kids saying they had caught about 75 of them..poor frogs, but what can ya do besides tell them to make sure they let them go when they’re done because “How would you like to be taken from your home and put in a box?”…which is what another mom had also said to them before me lol.

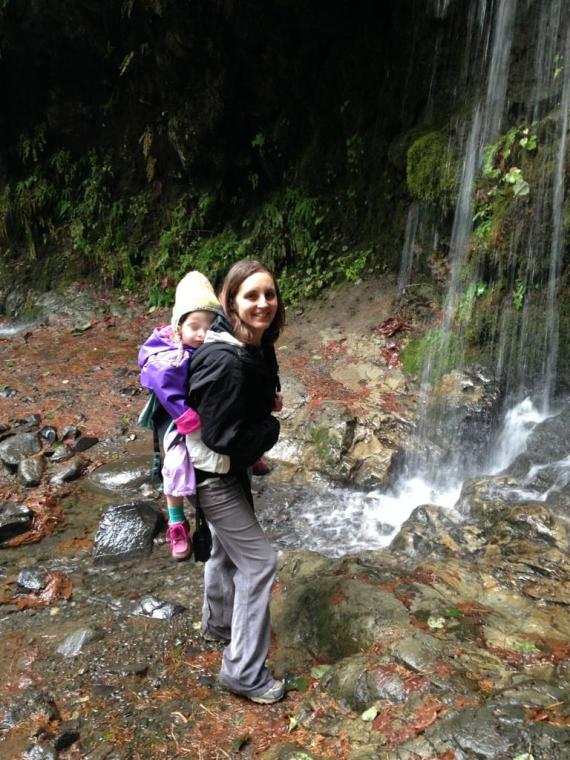
Okay so to the PCT! You can walk to it (a good 5-10 minute walk) from the campground, but we drove down the camp road to the trail-head cuz we have little ones all under 5 years old, and lets face it 4 miles of hiking is so much harder when you add a 10 minute walk (25 in toodling kid time) JUST to get there. I met a couple of guys, looked like father & son duo, who had started on the Mexico border and were headed to the Canada border..I wanted to hug them but I didn’t, I think they were kinda weirded out by how much I was smiling! *Seriously, it was like another world..not that it looked any different from other Oregon hikes, but just for the fact of where this trail can take you and how many other souls searching for meaning had walked it ๐Ÿ˜‰

Park at the Frog Lake Sno-Park area ($5 day use, or use your campground permit, or if you have a Rec/Forest pass then there ya go!), the trail starts by the bathroom. I think it is marked Barlow Pass or something like that, I don’t remember it saying anything about the PCT at the Trail-head but the thru-hikers assured me it was, There is a map there too. From there it is an easy 1.5 mile hike up..yes it is uphill, but if a 3 & 4 year old can do so can you..to the turnoff for Lower Twin Lake (this part of the trail is not the PCT), which is only another half mile downhill, yay! Lower Twin Lake was a bit chilly, was worth it. We cooled off, walked out on logs, checked out some alien looking bugs, and picnicked. There was even a father/sons combo who had tied some logs together and were floating around the lake! There are plenty of free camping spots (no bathrooms) around the lake, a trail that circles it, and from there you can continue another half mile to Upper Twin lake. The kids had a good time, no real melt downs ( I have to think that the handful of Dum-Dums helped with that hehe), and all the moms were grateful (I think!?!) to have done such an adventure, especially with kiddos in tow.

I would highly recommend the Lower Twin Lakes hike for a hike-in camp experience!!

On the last day we headed to the Day Use area ($5, or parking passes mentioned above) which has bathrooms & picnic tables, and busted out the kayak to float around Frog Lake. It was shallow with rocks and logs around the perimeter (fun for exploring on the kayak with lil’ ones!), but got deep enough to float pretty quickly. We paddled out to a stick sticking up in the middle of the lake and could see Mt. Hood in all its shiny whiteness. The picture above is my view from the back of the kayak at the stick ๐Ÿ™‚ I could see the bottom from the stick, so if I had to guess how deep it was I would say 8-10 feet.

Overall it was a great place to get outta town (less than an hour from Sandy, and about 10 minutes from Government camp..oh and cell service if you have Verizon, plus the camp-host sells firewood) and test out camping & kayaking with the kids. If it’s not their thing, you can swim, or do some nature exploring on the trail around the lake (I think you can even take that trail (Frog Lake Butte Trail??) to the PCT or the Twin Lakes trails, but I don’t think its little kid friendly..there are a couple blogs online that mention it so I would recommend checking them out first.), or just hang out at camp and go catch some frogs & play in the mud ๐Ÿ™‚

Leftovers = Love

Leftovers = Love

I LOVED making my first turkey this year for Thanksgiving, and I LOVED making Bone Broth from the leftovers even more!!

It was the absolute tastiest broth ever..I used the leftover turkey that I had stashed away in the freezer (bones, skin, meat and all) and all the goods that were stuffed inside (apples, onion, garlic & thyme). Throw it in the crockpot, add a quart of water, cover and cook on high for about 30 minutes just until it gets a good simmer. Then turn it down to low, put the cover back on and forget about it until this time the next day…well kinda, I squished the bones down to get them under water once or twice but you probably don’t need to. Oh…and good luck forgetting about it because it smells sooooooooooo good! I broke into it halfway through the day to make a little pot of Chick’n Noodle Soup, so I just replaced the liquid with water equal to the amount I removed.

The next day, I got these beauty’s! Two golden rich quarts of Bone Broth..it woulda been three if you count the quart I took out for the soup the day before. I seriously drank about a cups worth of the broth before I could put the lids on ๐Ÿ˜€ I put one jar in the freezer, and the other I used to make Tortilla Soup..the BEST Tortilla Soup I have ever had by the way!!

So without further mouthwatering tantalizing goodness, heres the recipe:

Tortilla Soup..the homemade way ๐Ÿ˜‰

1 small Bell Pepper, chopped
1 small Onion, chopped
3 cloves Garlic, chunky
2 Chick’n Breast, cooked (season with the same spices as below) & cubed
1 quart stewed Tomatoes, DO NOT drain (= 4C. or 32 oz)
1 quart Turkey Bone Broth (= 4C. or 32 oz)
1 pint Tomato Juice (= 2C. )(from straining tomatoes, you could use store bought, or water?)
1 15 oz can Corn, rinsed…boo I didn’t have homegrown corn in the freezer this year!!
1 15oz can Black Beans, rinsed
1-2 tsp. (each) Cumin, Chili Powder, Garlic Powder..I’d go for 2 ๐Ÿ™‚
Salt & Pepper to taste if ya want, don’t forget the cheese & chips probably add enough salt

Toppings~

Cotija Cheese
Cilantro
Avacado
Tortilla Chips

*Save a pan and saute the pepper, onion & garlic in same pan you cooked the chicken in. Once the onion is starting to get golden, add the chicken back in for a quick toss.

In a large pot add all remaining ingrediants, thrown in the chicken & veggies, give it a swirl. Bring to a boil over medium high heat, then simmer over medium low for a solid 30 minutes..just to get everything infused into yummy goodness.

Bust out a big bowl, ladle in some soup, and top it off with a generous sprinkle’n of cilantro, avacodo and Cotija cheese…and of course some tortilla chips! Enjoy, enjoy, enjoy ๐Ÿ˜€

~*Just a note, I always use Organic Corn & Tomatoes no matter what..most of the time all the other veggies are as well but if you can only do a little, then do the Corn & Tomatoes because they will most certainly be GMO if not, bleck!

Homegrown, homemade really does equal LOVE โค

Crafty Craft #2

Crafty Craft #2

Not so long ago, maybe 4 years hehee, I got a spice rack for Christmas. Don’t get me wrong, I love herbs and spices. But I grow most of my own, so this little rack of jars just never got used. I’m not one to just throw good stuff away so I usually end up re-gifting it to someone who would totally use it, or putting it in the closet until a crafty idea POPS! into my head.

I always knew what I wanted to do with the spice rack but the simple act of pouring out the spices was..for some strange reason..unethical or somehow wasteful to me. But, finally after 4 years, I reasoned with myself and said “It’s OK, just do it.” So I did. And it felt awesome!

Anyways, enough of my ‘insane love of never wasting anything’ and on to the project ๐Ÿ™‚

My kiddos art drawer was a complete mash of little bits of string, buttons, googly eyes, poof balls, bags of glitter, you name it! And every time she wanted to get arty, it involved a pile of colorful art~like vomit all over the floor, and guess who had to clean it up? Me. So I thought, how cool would it be to have all the fun craftys in one easy~to~get~to spot AND be able to see each little obect of creativity…WITHOUT GETTING IT ALL OVER THE PLACE!?! It was easy peasy (as the lil’ bee would say!). Just empty the jars, wash & dry them, then empty the art drawer one little piece at a time into their new glass jar homes, and onto the rotating spice rack. That’s it! Done, organized, and fun at your fingertips..one jar at a time.

*My kid was raised using mason jars for cups so I trust her to have glass jars for her craftys, but if your kid isn’t there yet then, just put the rack up somewhere that they can still see it..but need your help getting to. I really like the idea of it being at her eye level and having easy access that way she can get arty whenever she wants..which is all the time ;D

Life as an adventure ;)

Life as an adventure ;)

It’s getting to be that time of year again when adventurers start planning their warm weather adventures..hiking, backpacking, camping and exploring!

Last season, I adventured as much as possible. I had a great hiking buddy who also had kids in tow, and we both liked to push ourselves (and the kiddos) into going just a little bit further. It worked out great, especially when we went to the Bonneville Dam and Eagle Creek Trail in The Gorge. Our plans were just to toodle around and see the spawning salmon, maybe hike a little around the river. But before we knew it, we were a mile up the Eagle Creek Trail walking along the cliffs and under rockside waterfalls. My lil’ bee slept the whole way up, and when we got to the view point she said “How did we get here Mamma?!?”…I may of been out of breath and a little dizzy but just hearing her say that was pretty much worth it. My friends kiddo did a great job hiking along the trail too, his ability to safely (and happily!) hike all the way up was impressive! She had the utmost faith (and curiosity) in him..and that’s what most important when raising little adventurers ๐Ÿ™‚

Little kids and mammas (dads too) are super beings that can master any adventure they put their minds and bodies to. This year has just begun but I’ve already got a big hike & camp adventure awaiting us at McKenzie River Trail with one of my bestest friends and her lil’ guy..I can’t wait!! Then it’s off to the beach for camping and exploring with some of our good friends from back in the day.

I hope it is a great year for everyone, and I look forward to seeing everyone getting all adventure’y on their own and with those around them. If you can’t seem to do it on your own, find a friend who will jump in with you..or check out meetup.com (or local groups on Facebook), that’s where I first met my hiking buddy! Happy Trails ;D

into the wild with thee..

into the wild with thee..

This isn’t really homestead’y, but it kinda sums up all that I’ve been doing since my last post. My heart has been aching for more, more of everything..more hiking, more simplicity, more love, and most loudly more good food for the mind body & soul.

In the past few months, I’ve made my first batch of sauerkraut and homemade yogurt (and LOVED it!)..I’ve hiked further than I though I ever would with my lil’ be strapped to my back (and it was totally worth it!)..I pampered myself with the help of a true friend (Worth every penny too!!)..I have released myself from a ton of things that were not useful to my life or that were holding me back (still need to go through that stash of fabric I’ve been toting around, hoping I would someday become a bad ass clothes designer..don’t worry i will save a few things, but only the really cool stuff!)..and I’ve shifted my focus from doing to just bee’ing.

You see, it’s what my heart wants, to bee me..to bee free. Free of the limitations of having too much and doing too much. It’s the simple things in life that bring us pleasure, and that in the end bring us the things that we truly need to be happy.

So this year, I’m following my heart…and it’s saying Good Food, Good People, Good Times in Mother Nature, and Goodbye to those things that do not promote Growth & Love ๐Ÿ™‚

Happy Trails, hope to see you out there getting your BEE on ;D

Tomatoe, Toe’Matoe, t’mater..

Tomatoe, Toemato, t'mater..

Dehydrated tomatoes!!! The easiest, bestest way to preserve that rich, summer flavor of your garden ๐Ÿ™‚

Sometimes I think I’ve got this, one dehydrator is enough but then other times when the kitchen counter and the picnic bench are covered in bright red gems from the garden I start to think I need 2, or 3 dehydrators.

Luckily, it only takes about 12-14 hours to get theses little tasty treats from garden to freezer baggie. My fave method is slicing them up lengthwise, scoop out the seeds with my thumb, then toss in a big bowl with Olive Oil, Balsamic Vinegar, Garlic Powder, Sea Salt & Pepper. You can use fresh garlic, but I’m just trying to get it done. NOTE: Easy on the salt, it really announces itself in the dried product!

Another NOTE: For my Juliette’s (which are THE Italian drying tomato), I quarter these..for cherry or pear tomatoes I halve them…and San Marzano’s (the Italian paste, best thing ever!), I usually quarter then halve these, if they are too big.

Spread ’em skin down on your drying rack, not touching, push start and go to bed. Psst..starting them at bedtime is the best time, set it and forget it, couldn’t be any easier. Wake up, check for the dry ones (I like to set them on a plate to cool for 20 minutes or so, so the don’t steam up the freezer baggie), rotate the not so dry ones to the bottom rack and check every hour until just right.

Just right for me is hard on the outer edges and a little chewy/soft still on the inside/middle parts. I store mine in the freezer once done because I am still new at dehydrating and I fear loosing all my precious yummys to mold for accidentally getting a not-totally-dry one in the mix, it would be tragically sad! I have stored them in Olive Oil in the fridge & freezer as well, but I don’t like how the extra Olive Oil overwhelms the rich Sun Dried Tomatoe taste.

I hope you love them..and do this!! They make great salad, soup, pasta, pizza (put on pizza near end or even after pizza is done otherwise they puff up and burn, major bummer!) toppers and even just good for snacking..straight outta the freezer ๐Ÿ™‚

Meme of the Week

This picture reminds me of why I do the things I do…like making a crafty spinning art supply holder outta the old seasoning rack, or the seed starter I re-purposed from out take out box, or the shoe box that I glued magazine pictures all over to make our new crayon box fancy. It is all pieces of me wandering out into the world for everyone to see ๐Ÿ˜‰

Studio Mothers: Life & Art

Why did she make things?

Happy Friday.

:::::

View original post

Grow where you’re planted :)

Grow where you're planted :)

I’m not saying be a dead tree and never leave..but grow, even if it’s just a little!

Anyone who knows me would say I move ALOT. Just ask my cat if you don’t believe them ๐Ÿ™‚ He turns 15 this month, and he has lived in 3 different states, 14 different cities and even a few hotels (yes, I’ve taken my cat on extended vacations/jobs to live with me in the hotel!). So you see, I move alot.

But this hasn’t prevented me from growing. I’ve done alot of growing both on the road, and in my many temporary homes. I’ve made Halloween costumes, pot roast, and sewn my wedding dress in a hotel. Don’t tell my future landlord, but more than once I’ve even dug up the front yard of a rental house and planted a garden. This is how I grow.

You can be an annual, a perennial, or just a weed waiting to find ground to go to seed. I set root by finding the opportunities that surround me wherever I grow. I look for the best park to play or hike, a fun group or class to join, the best local grub stops, and eventually I pop a couple seeds in the ground. This doesn’t always mean I make friends or fall in love with where I am..it just means I can grow wherever I happen to bee.

Along the path, I’ve learned that you truly DO have to grow where your planted..otherwise, you just wither away like an under~watered plant in a way~too~small pot. You don’t need permanence or some material item to claim as your own to find happiness, all you need is to put down some roots and make the best of what you have with the resources that abound.

Someday, I do dream of bee’ing a old Oak tree with roots that spread beyond the soil and into the deep blue sea…but until then, I’m just going to bee me and see where the breeze takes me next..leaving behind a few seeds of love & knowledge to those I’ve had the privilege of growing next to ๐Ÿ™‚

The Daily Post

The Art and Craft of Blogging

Studio Mothers: Life & Art

Meet your creative goals